3414 Jags Woven Yoga

3414 1A

When I’m having problems, I find that it really does help when I stop; put aside my project and turn my attention elsewhere. Yesterday, I put everything away neatly and went upstairs dinner and a Christmas movie. It’s that time of year. In the morning, I knew what to do.

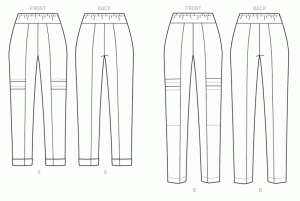
I ripped out the crotch, again. Pulled one leg in the other and pinned the crotches together ready for recutting.  Then I pulled out the final tissue for 6461 to compare with 3414 1A. If you haven’t rad Morgan’s post at SG, I truly recommend you do so, especially if you are having problems fitting pants.  Morgan gives a list of things to check when your pants don’t fit. It’s not the normal or most familiar list.  At the end Morgan says, if none of the above work, probably the crotch shape does not match your own. (This is not an exact quote therefore not in quote marks.) So in the morning I said “Hmm. How can I check that easily?”  Hence, I pulled out 6461 and compared with 3414.

The 3414 1A front crotch extension was just slightly longer (and of course the inseam curve just a bit different).  That was what I wanted. I felt that  6461 could stand just a little more length, I was thinking 1/8″ on both front and back.

The back crotch was also a little longer but more importantly there is this distinctive scoop (colored with a black Sharpie for clarification).  The curve actually starts changing up by the hip line, swoops down at least 1/4″ deeper than 3414 1A, then bends back up and terminates at the 1/4″ back inseam. Huh!  Could that make enough difference?

So not entirely convinced I’d discovered the error and tired of unserging, I serge finished the crotch and the inseams so that can be easily ripped apart again.  I’ve got enough fabric left over to make a big, really big, like waist-to-knee gusset. If that’s what it takes. After trimming the back crotch to the new crotch shape, I stitched crotch and inseams with water-soluble thread. I also restitched the side seams, with WST,  after pinning them several places. I was hoping to remove the drag lines that suddenly appeared when I took the side seams in another inch.  I have the hems at 22″ now but I’d rather have 18-20″.  I like the 24″ hems for certain fabrics, certain occasions. Did I mention walking along the beach; wind blowing through my hair; tugging my pant legs?  Ah… back to SD in the winter…  I basted the inseams removing another 1/2″ at the inseam. Thereby reducing the hem circumference to 21″.  Little more than I prefer, but much improved over 24. Then of course it was “Take A Picture Alexa.”

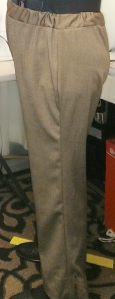
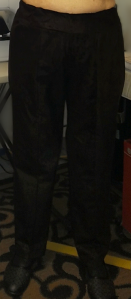
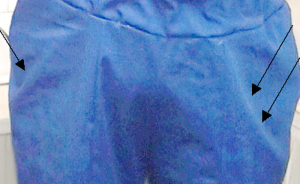
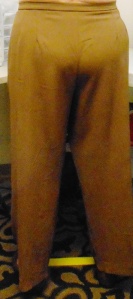
Once again, my right-side pant-leg hangs pretty nice. I’d say beautifully but I’m sure someone will take exception and point out some bumps and drag lines below the knee. Sigh, the left side

Not so good. Nearly the same set of drag lines as the previous. I would hate to wear these pants looking like that.

OK so I didn’t get these pulled up evenly at the waist.  It’s one of the things I dislike about elastic waist pants. Any VPL is justified today and also I have a camisole tucked in. Fortunately I wear my tops long enough to cover this. Always. More concerned about the drag lines forming around the knee and not sure if that is fitting or fabric.  One of the reasons I prefer the 18-20″ hem is that it hangs better. Has less of a tendency to develop these kind of drag lines.  You know, it’s just too bad that Advertising has done so much air brushing that we expect to wear pants that have no  hint of a fabric fold, at all. Bottom line, I like the front.
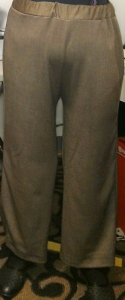
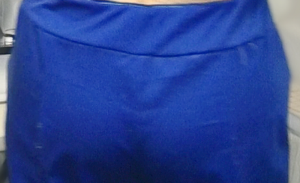
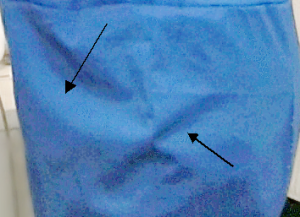
Looking at the back

There is some improvement over the first photo.  I have not pressed well since before cutting the fabric. The WST likes to disappear when I hit it with steam so I put off pressing until I’m pretty sure I’ve made all my changes. It’s just that I’m wondering if that would be a benefit. But I have to admit, the back is still pulling towards the front, just not as much as when I started this party. I think it is definitely time for a different gusset and more length on the extensions. Oh, BTW, the last change to the back crotch created a barely peaked intersection.

So what became the final fit, I extended the crotches the old recommended way i.e. slice down and rotate out, spreading both front and back crotch points 1/2″.  I’ve added a total of 1″ length under there (stride) plus whatever little may have been added when the back crotch was scooped.  I cut a couple of big rectangles from my left overs and set aside. Then I sliced off the crotches of the pant-in-construction.  Lined up the rectangles with the newly trimmed crotches; and serged rectangles to crotch.  Pressed the seam just created and started an unexpectedly difficult aligning of the back crotch pieces and then front crotch pieces.  Oh my. They really didn’t want to cooperate. I finally got the fronts cut and started the same wrestling match on the back crotches.  One of my rectangles was not as wide as the other. So when I placed the tissue on top for cutting, I had a shorter side. A side not big enough for the entire crotch length.  At this point I’d already mentally decided I wasn’t applying another gusset to this pair of pants. I have more fabric, but the pant crotches have had it. I thought of cutting off the too short gusset but felt like the crotch just wouldn’t take the extra handling. So I trimmed off that gusset and added yet another piece  carefully aligned with the fabric stripe.  Now I cut a gusset of sufficient length.

Following on the thought that these pants weren’t going to make it through another gusset application, I serged back and front inseams together; serge finished crotch edges and then stitched the long inseams together. To my horror, the pants developed an even bigger point in the crotch that ever before. To smooth the curve out, because I can’t wear something like that, I stitch straight across the point.

I measured.  I removed an inch in length. I removed equal to what I have added during the 3 sewing/fitting sessions of 1A! Now totally assured that this pant is done and likely not to fit, I finished all the seams.  Removed the WST and stitched with thread at the original sewing line i.e. even though I have been trying to narrow the pant leg, I stitched it at the full 24″. I had not managed to make the left side seam look any nicer then it did to begin with. In my mind, no use in sewing it that way, let’s go back to where that seam was nice.  I also removed the 1/2″ very nice seams that I made 1/2″ in at the inseam.  I hemmed with hardly any care but did lightly starch and carefully press, not sparing the steam.  “Alexa, Take a pic.”

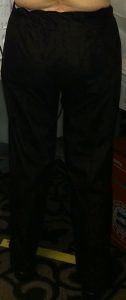
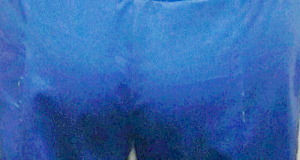
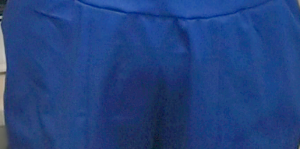
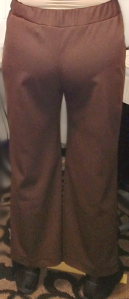
Both side seams look exceptionally nice, again.

Actually the front doesn’t look too bad.  The left side is rather good except for the fold that develops along the side of my leg.  Not sure if I should be concerned about that. After all, a drapey fabric will follow the body beneath.  My front waist is pulled again to the right side somehow.  I don’t understand this. I quartered the elastic; quartered the waistband. The elastic is stitched on the facing side and aligned with the quarter marks. It shouldn’t move around. Yet, it wants to pull left. I’m not exactly sure what to do but it may not matter if the back is as bad as expected.

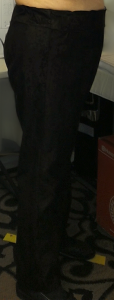
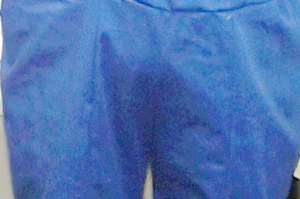
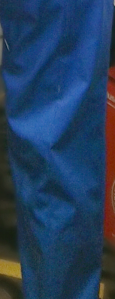
… and then the back, totally surprised me. This is not terrible. It’s not even bad. I thought with that awful gusset and having actually cut off the length added, it would be uglier than sin. These things are WEARABLE.  Holy cow, I need to quit now and do something else.


3414 Jags Woven Yoga

3414 V1A

Following my experience with Butterick 6461 in that deep rich corduroy, I couldn’t wait to check my previous patterns and see if extending the crotch extension length (the stride) would be the final key in making pants fit my  (clearing throat) maturing body. I’ve retrieved my first  tracing  of 3414 on which I made only the hip and inseam darts (Peggy’s standard for taking away the back leg wrinkles) and the side darts (I need because my sides are shorter in comparison to the crotch upright lengths).  My title “1A” is because in my mind this is the 2nd time I’ve done this dance but is totally different from the V2-4 tissue copies.

I chose a nice fabric although 100% polyester.  This is the type fabric that causes me to groan when people lump all polyesters into the ‘sticky, icky’ category.  Poly has been researched, investigated, and developed into tremendously better fabrics although I can still find an icky sticky (usually on the $1 table).  This one feels like a good wool flannel but it goes into the washer and dryer without any adverse effect. It is not entirely a dark brown and hard to read, because the 2nd thread in the herringbone weave is almost a golden  brown.

My objective was to increase the length of the crotch extensions. I started by adding a largish tissue rectangle behind the crotch then made a tick mark 1/2″ beyond and level with the crotch tip.  One of my challenges is all the excess ease over the back thigh which gets there due to fabric needed across my butt and in the crotch. Hoping to minimize the amount of fabric added, I fetched my curve and drew a new curve  joining the inseam as quickly as possible. Repeat for the front.

Love this pattern. 3 pieces. Front, back and waistband. I cut and finished the waistband first with all permanent stitching.  I cut the back and front and serged them together along the inseam. I serged finished the resulting large pieces but stitched the side seams and joined waistband to pant with water-soluble thread.  I turned up the hem and fused it, all except for 4″ over the side seam. First try on had me asking “What the >>>???”

Camel Toe. Butt parts. Wrinkles and drag lines. This pattern used to fit pretty nice. I was working only on narrowing the hem circumference when I tucked it away.   OK have to confess I did see an issue when I was sewing.  I like to join the inseams and then sew the crotch seam in one long go. I like the way that feels when I wear my pants. However the new crotch formed a distinct peak.  In order to smooth that uncomfortable thing, I stitched a smooth arc removing about3/8″ from the length of the extension. In effect, I added 1/2″ length but took some back. I should have been looking at the last version only slightly improved, not this.

I think it over and go back to the tissue where I added more Aisle Runner (can I start calling that AR?).  I roughly traced the existing crotch then drew a new one which is a full 1/2″ longer but 1/2″ lower on the back and 1/4″ lower on the front. Huh?  Well my sewing angel told me the best pants she’d ever had were altered by an expert by simply dropping the back crotch another 1/2″ and making kind of an L  crotch but a bit lower. Since I’m feeling a bit of downward tug at the back,  I decided a little more length to the upright was not a bad thing.

Back to the fabric again, lots of WST in this so no issue ripping that out of the some seams.  Ripping out the serged seams a bit of pain. But eventually I was able to open the inseam and crotch seams enough that I could get in there and add a gusset. In this case, I serged  an approximate 3×4″ rectangle to the crotches, serging off the excess and previous crotch extension.  Then I put one leg in the other, pinned the front to the front and back to the back crotch; put the corresponding pattern piece on top and cut the new crotch. Repeat for the other side. Much faster to tell and share photos that it was to do. I tell you both the fabric and the pattern wanted to fight me.  Probably because I wasn’t taking close as good enough. I made it as exact as I can.  Sadly, my crotch still peaks

more than I’d like.  A  I thought the previous alteration would work perfectly. I thought surely dropping the points would eliminate all issues. Fortunately, it’s only about an extra 1/8″ that needed to be stitched on the body side of the crotch seam.

At the same time, I basted the side seam from about level with the crotch to the hem gradually until it was 1-1/2″ deep instead of the 1/2″ I drafted.  I like the 24″ hem for summer pants. Love walking on the beach with my pant legs fluttering in the breeze.  Also love the air circulation up the legs when I’m sweating like a ***** when the heat hits triple digits and I need long pants to protect me from the blistering, sun burning, orb in the sky. Anyway, I basted a 22″ hem making the change on the side seam only.  I know the advice is to subtract evenly from both inseam and side seam. But when I looked at the first pics, I just did not want to take any more fabric from between my legs.

And the verdict is….

Well one  side seam is not as smooth as the other. I’d say possibly I stretched the fabric or the fabric shifted during stitching. Because I’m seeing a few curves not previously visible,  I also wonder if I started the seam too high. But the really important thing is the front and the back:

I think the front crotch is nearly perfect.  I’m see a little pubis bump far above my own?  Not sure what caused that. I’m also seeing diagonal drag lines from leg to side seam.  They were there before in previous versions and I’m not sure why.

But the kicker is the back crotch and leg:

Oddly, I’m seeing VPL which can’t be because I’m wearing boy short and they rest at the waist. I mean there is no panty elastic or anything else where that horizontal line is. Honestly, I don’t think  I know why that line is there. The crotch itself looks and feels good, but I still have upward diagonal lines that disappeared in 6461 when I added length to the crotch. I’ve added more length to 3414 1A than I did to 6461. What’s up with that?


I question what to do next. I’ve already made both the maximum  hip and inseam darts Peggy recommends and there is a point where they cease to have an effect.  Peggy herself has said that a dart can only affect so much effect.  Do I make another gusset???


………………………………………………………Please come back. I”ll have more to say tomorrow.


6461

6461 in Rich Corduroy

So you saw the finished garment. It is that dark and photos below are much lighted. The fabric was only 48″ wide . Fortunately I bought 3.5 yards when I ordered it from Fabricmartfabrics.com. I used 2-2/3 yards. Well a little less because there’s big hunk left from the 2-2/3 that is folded away with the full 1-1/3 yard back in the stash. BUT I’ll have to think carefully and pull some shenanigans if I try to use a fabric that is an even 2 yards long.  BTW sewing was a breeze. Total 1 hr 45 minutes before pics.  Clock started with ironing the fabric and does not include the pattern alterations.

Being mentioned, let’s go directly to the final tissue alterations. Starting with

LENGTH

Legs were shortened 1/2″

Hem changed to 1″, my preference in hems is 1.25″. Already I was thinking of reducing that 2.25 yard requirement.

CIRCUMFERENCE

Folded out 3/4″ (3/8″ tuck) from top to bottom of the front leg and front waist piece.

Before I go on let me share the final tissue:

Front ——————- Back

Hope those can be enlarged so you can see the changes.

DEPTH

Starting at the top:

The Side Front and Side Back (outermost pieces of the leg) each needed to be reduced in length by 2″. This is a depth change because it does not extend across the entire pattern piece and it is not the same width i.e. instead of a tuck it is a dart. As a matter of fact, 2 darts each  1/2″ deep reducing a total of 2″ length on both pieces. A 2″ dart is a monster producing jagged edges. Just as easy and produces a nicer edge is making the two 1″ darts. To me it was astonishing to see the curvature introduced on both sides of the side pieces. I wondered if I was going to have an issue sewing the center-leg back and front seams together. Answer is no, they are still the same length even though the curve as changed.

Added 3/8″ to both front and back crotch points. Which you don’t really see as I incorporated the change in the seam allowance changes.

Added 1/8″  to hip on both back and side back. Which again you can’t really see because it is incorporated into the seam allowances.  If you could see my tissue compared with the original you would realize there is a greater curve  then the designer drafted. It’s purpose is to add a little more circumference at furthest point of protrudence. It is a depth issue performing  akin to a vertical fisheye dart except at the rear and adding fabric instead of taking fabric away. Depth, because the change is not the same from top to bottom.

Finally, I adjusted all the seam allowances to my preferences as follows

  • 1/2″ Seam allowances
    • side seams front and back
  • 3/8″ Seam Allowances
    • Bottom Yoke SA
    • Top pant SA
    • Back and front Crotch
  • 1/4″ Seam Allowances
    • Top of Yoke
    • Top of Facing
    • Yoke and Facing side seams
    • Center Leg seam both back and front legs
    • Crotch seams both back and front

It actually took me longer to reduce the seam allowances to my preferences then it did to make the Length, Circumference and Depth changes.  All total about 45 minutes.

Continuing with the sewing saga… well nothing to it.  I like to make the Yoke unit first when sewing Yoga-type waistbands. Because I had reduced seam allowances to 1/4″, I quickly serged the yoke side seams and facing side seams. Then put them together and serged the top of the waistband.  I triple stitched the top seam to the facing. I cut 30″ of elastic at the same time as I cut the yoke and facing. Now I divided both into quarters. separating the facing from yoke and using a long triple stitch (5mm wide, 3mm long) I stitched the elastic to the facing at both side seams and center front, center back.  I had aligned the two raw edges at center back and made 3 rows of stitching from top to bottom.  This attached the elastic and marks the CB for easy identification going forward and during wear.  I gave it a second good pressing and then serged the lower edge together. 10 minutes and my waistband unit was ready!

Next I serged the center leg seams of front and back, then serged the inseams making 2 units each consisting of a front plus back. I took the time to serge finish all the raw edges at this point. Which is tedious but all done instead of repeating the serge finish multiple times.   I’m happy to say that the Imagine adjusted between single and double layers without missing a beat nor offsetting top layer to bottom. Happy because not having to adjust tensions back and forth actually speeds up sewing.  next was sewing the side seams at the SM. I stopped to hem the legs at this point because it is always easier to handle less fabric.  Then tucking one leg in the other, I stitched the long crotch seam.  Last, also at the SM stitching the waist band to the legs unit. I did not baste but did use a 3mm stitch in case I need to rip anything out.  Deep breath and “Alexa, Take a picture”.

So let’s talk fit:

I want you to notice that the side tops are not collapsing creating wrinkles. That 2 inches was absolutely necessary. Also take note that the top of the yoke, despite being shortened 1.5″ is still a little wavy. Oh and I dare not shorten any further. It was close — no stitches popped- when I pulled it up and over my hips. However, it’s not as gathered as some of the pants I’ve worn and it is acceptable to me. This is a woven fabric in a pull up pant. Has to gather at the waist.

I am truly pleased that the front looks excellent!  Actually, I’m accustomed to the front looking excellent and have been surprised of late with front that are not attractive.

The back falls in the good+ category. Look no VPL, nothing bunching in between the cheeks; no X’s in back; knees aren’t dimpled.  It’s been a long time since a semi-fitted pant has looked this good. But year I still wish I could remove a little more over the back thigh.  I may have to accept that is not going to happen because it’s obvious I really do need the crotch extensions to be this long; and maybe just a tiny bit longer.

I love how the untouched photos make me look slim:

…and even though the hems finished at an unheard of 16″, they don’t look like *carrot pants either.

Possible Fit changes:

While the rest of the pant feels fantastic, the knee feels restricted. Since the yoke was “interesting” to pull up over my hips, I think I’ll change the tuck on the front pant leg and front yoke from 3/8″ to 1/4″ removing  1/2″ instead 3/4″ from each leg.

I may  work on reducing a little more ease in the back hip.  I mean, sometimes it is better to leave well enough alone and it ain’t bad right now.


Possible Style changes

I may or may not, increase the hem circumference.  It’s a style change that isn’t essential but is available if I want to make the hem more current/trendy.

I may add a zipper and create a sleeker waistline.

I’m much more likely to use this as a block for other patterns. It was very fortuitous to read Morgan’s advice. Now armed with this new advice, I’m definitely thinking of revisiting other patterns that I felt failed me. I think the most important lesson learned with this pattern, thank you again Morgan,  is the need for longer crotch extensions. Scooping does not seem to add the stride-length I need. It makes me think of all those pants which have a lovely fit, until I tried to reduce the hem circumference or thigh ease.  Somehow, my stride is able to ‘borrow’ the extra length it needs when pants are less body-con. I don’t understand the mechanics but I’m not letting this bit of new knowledge go to waste.

^^^^^^^^^^^^^^^^^^^^^^^^^

  • Think of a wide neck carrot extending into a single thin root.
6461

Fit 02, 03 to infinity and beyond

Prep for the Fit 02 pics was quick. I folded the pants inseam to side seam, laid them on the table and trimmed 1/2″ above the shorter front leg. Done!. Fix the waist elastic a little more complicated. Fortunately I had used water-soluble thread. I spritz the stitching that secured the elastic to the facing.  While it worked at dissolving the WST, I opened up  8″ between the yoke+facing and the pant leg. Then I reached in between yoke and facing and pulled the elastic.  Found the joined ends and opened them. Pull out the elastic. I measured the elastic for my known starting point and cut that length (31″, Does that matter?) Put the elastic back in; joined the ends; closed yoke to top of pant seam.  Did not secure the elastic to the facing.  Then took pics.

Oh nice, the pant wants to stay up this time, but I do feel a little tugging at the back crotch. I may be thinking of scooping.

The waist looked about the same which almost guarantees that I will be adapting for a zipper to produce a  sleeker fit at the waist.  It is the back which surprised me. I’m not sure that I need to let out the back:

I’m more concerned about the tug I was feeling. However the front definitely needed help:

So then started a series of taking in the front and even though unsure it was needed, I let out the back 1/8″ over the seat. The front, I took in a 2nd time and then said “Hmmmm.  Usually, I take an inch from the front and add it to the back.  This time, I don’t need more in the back, but I definitely need less ease in front.”  So I stitched the CF leg seam on my 1″ mark which is really 7/8″ wide. And took pics.

The back seat

Perfectomundo! OK there’s a little poof directly below the CB waist but, you know, it’s that kind of pant. Not sure I will do anything to correct it, especially since it will be covered by my tops.  The front leg

is not bad. I don’t think I will do anything to it either, except that the front crotch

Oh! My! Where did that come from?  Until I took out most of the front ease, there was no hint of camel toe. But dang it’s there now.   Also take a look at the back leg

It is now sort of buckling at the knee? While not a clear X, it is more prominent than earlier pics.  Light Bulb! From Morgan’s  input at  SG  “If the front crotch curve shape is too straight (or too short) it can pull the back to the front and cause draglines to form at the back”  Fortunately, that was a recent post and I remembered it. And then I think “Hmmmm the back  is pulling, the front has camel toe. Maybe I need to let them both out at the inseam?” I ripped open the inseam about 3″ on either side of the crotch and let it out 3/8″ because any less than 1/4″ seam allowance seems to shred even during minimal wear. And WOW

Back crotch  —————————-Back leg ——————————-Front crotch

OK yes there are still issues, chief of which is at the side, above the hip.  Before the previous fit, I had not seen evidence that the sides were too long.  It surprised me because every pant pattern I’ve fit in the last 3 years needed a dart on the side to remove:

The side is too long as a result of making the front and back crotch long enough to go over a protruding rear and prominent tummy.  It will need a dart fish eye dart that extends from about the middle of the front pant leg, crosses the side seam and terminates then about the middle of the back pant leg.  The widest point will be directly over the side seam. I think an alternative would be choosing a pattern that has the correct side length and then making horizontal slashes to add length to the front and back crotch along with vertical slashes to add enough circumferences. Sounds like more work than a couple of side darts so I haven’t gone that route yet. Besides, for this style, with the 3″ wide yoke, it’s really easy to just open that seam between yoke and pant leg and tuck the top of the pant leg up far enough so the yoke hangs evenly. Next alteration: side dart; and then could it be that I am ready

…for…

…good….

…fabric?


6461

6461: First Fit

Let’s start by admitting I made 2 mistakes. First I didn’t pay enough attention to the hemming directions and hem markings on the pattern. Secondly I managed to sew the center seam of the front piece to the side seam of the side front. Didn’t notice until I was stitching fronts to back. After a bunch of pulling out checking original patterns; checking tracings; seam walkings, I realized my two errors. So when you see the muslin the front is shorter than the back (my bad on the hemming). But I did manage to get the fronts stitched together correctly and stitched to the backs.   Like others, I don’t like the instructions for the yoke. I did not attach the yoke to the pant and then the facing to the yoke. Didn’t understitch although I did top stitch after sewing back to front yoke pieces and then yoke to facing. I don’t like facings. They always tend to flap about; come undone, peek out when I want to look neat. So I  attached stitched both yoke and facing together and to the top of the pant leg.  A 3rd goof, I followed pattern instruction of cutting elastic to your waist measurment plus 1″.   Didn’t follow the instruction to pin together and adjust. Nope. Using WST, I lapped and stitched the elastic ends; divided in quarters and secured to the facing in 4 places. I should know better. Really I should.  Even as I was taking pictures, I was hitching the CB up and it kept sliding down. Simply was not tight enough at the waist to hold in position.

Before looking at pics, one more thought about the preprocessing. It’s going to take more time to stitch this style together than others. Just because there are so many seams.  I’m going to compare stitching time as more like jeans than with yoga pants. Even if this pant works easily for me, I’m still going to have reservations about using it.  Just as TJ906, it requires 2-1/4 yards. Can’t get around that. Even folding out the tucks and eliminating hems, placing the pattern pieces on grain takes more yardage. Most of the time I buy an even 2 yards.  If I really like this pattern, I will have to change my habits to buy more. For the near term, probably not using this pattern.

So onto pics

Like others I think the waist is more gathered that I like

but I’m conscious that a woven fabric must have more gathering than a knit. I can’t remember having any stretch-wovens that would stretch the inches I need to go over my hips and still fit my waist exactly.  They have to be gathered to my waist. I think I need a zipper to achieve a really smooth look at that waist. But I may be able to remove a little ease. After all, the size I chose is actually drafted to fit bigger hips than my own. Despite adding 3/8″ to the side seam allowances,  I stitched at the drafted stitching line. The yoke stitched 1:1 with top of pant. Easy stitching.  I used 1-3/4″ wide elastic and  think it really is necessary to secure the elastic at the top of the yoke. Otherwise it’s going to roam around inside that chanel. It was at least another 1″ wider than my elastic. The widest elastic I have is 2″.  Bottom line: I see what the others were saying about it being gathered more than the liked but I don’t think there is much I can do to change that without  changing to a knit fabric or adding  a zipper.

Typical for me, so don’t hold this against the pattern, I have too much room in front and not enough in back:

Used to be the front would look just right but side seams would curve sharply towards my seats showing me exactly what I had to let out. With modern fabrics, the back stretches and stretches some more while the front hangs loose and I see a perfectly straight side seam:

Unfortunately I lose a critical tell. Fortunately, the pant is sitting at my waist and I will have a good idea just by measuring where I should let out the center leg-back seam  Usually I’m forced to work on the side seam trying to add more room to the interior of the back.Often that doesn’t work well.  Sometimes it results in needing a 3rd back dart or changing the back crotch curve. Neither are ideal but both are better than VPL.  I’ll also have the luxury of tweaking the front center-leg seam to remove excess circumference. I gain my weight pretty evenly i.e. my padding doesn’t land stictly in the saddle bags. My sides are fairly straight or at least that’s a gently arc. Sometimes changing that arc doesn’t help at all (especially with modern fabrics).  For the front, I have been forced to either attempt a discombobulated tummy enlargement (similar to a full bust adjustment) or, once again, alter the crotch curve by adding a wedge at center front.

Interestingly, back of leg

looks too large over all between butt and ankle rather than the usual  too much between butt and knee.  I won’t tackle this immediately. I’m sort of following Peggy Sager’s procedure. It’s a good procedure but even she admits it doesn’t work for everyone’s draft. In fact, Peggy refuses to fit patterns other than her own because she says she has no idea what changes they have incorporated; and where she can spot where her changes don’t fit your figure, she can only guess for other pattern lines. But I’m starting by saying: Hey look

It sits at the waist (like I like)

The crotch is where I like it

It may still be a little long

LENGTH:  trim 1/2″; adjust elastic (keep those pants up!)


So I probably will need circumference adjustments but not until after the 2nd set of pics.  First, I’m getting LENGTHs correct.


6461

B6461: Pattern


As I was saying, my attention was grabbed by B6461 due to 2 rather favorable reviews at Patternreview.com and the envelope back

This pattern is a 4-piece leg slacks pattern. I love TJ906 because it is a 3-piece leg with center seam in the back which allows so much shaping of the back. Well this pattern allows additional shaping in both the back and the front on a slacks pattern. I do not want my trousers to fit like slacks (and yes I do have use for old-fashioned loose trousers); and I don’t want my slacks to fit like jeans. Exactly. I mean there are some similarities just because of my waist, hip knee placement and physical dimensions. I expect a trouser to skim it all i.e. hardly can tell there is a body beneath. I want my jeans body conscience without being able to actually see the lady parts or count any hairs. Slacks to me should be something in between: close at the waist to the hip, dropping a little more freely to the ankle but still following body contours. To me trousers show no curves; jeans show it all (like right in your face) but slacks skim, hint and suggest the lovely form beneath. Like that description?  That’s what I keep attempting and failing to achieve with today’s pant patterns. I cannot adjust slacks fit to my satisfaction. So my eyes sort of lit up when I saw the schematic with the additional 2 seams and I ordered it through Patternreview.com.


This is my first Tilton pattern. I can’t keep the sisters separated so I lump their patterns together and I’ve made none by either. Their patterns are always interesting but a little too artsy-fartsy for me. I’ve passed the phase of engineering-interest. I’m not as excited about interesting seams and clever sewing processes as I am with easy to fit to my body and embellishment possibilities. Fit has been a real sink hole for me the last few years due to my aging body. While embellishment is more of a creative outlet. One which I adopted way back when I tailored my appearance to fit in a male-dominated work-field.  When I worked, a woman was either poontang or team member . One or the other. No in-between. I feel that women are really fortunate today because they can choose to be both; or neither. Anyway, first Tilton pattern because while it does have some artsy elements, I zeroed in on the fit aspect.   I think I’ve known for a while that just as I need seams to fit my -lets call them- mature curves under my blouses and tops, I also need seams to fit pants around the curves waist and below.  With 6461 I have not 4, but 6 seams. Yes, the 4-piece leg and the 2-piece shaped yoke. I was also excited and tried hard to contain myself, as the pattern envelope says the hem circumference should finish about 17″.

Be still my beating heart. I have pant pattern after pant pattern that fits nicely until I try to reduce the hem circumference from 24-25 to 18-19.  I will swoon if this work. Swear.

So I start by considering size to trace. As usual I fall in between sizes.  Usually I’m between 16 and 18 (RTW I’m 14-16). This time I’m between 18 and 20. Only 1/2″ away from 20 which I selected because I’ve had the experience of choose the smaller size and not having enough fabric even by expanding to a 1″ seam allowance!   I did not trace the front which was  divided at the knee. I put that away in case I might like to use it some time in the future. I traced all the other pieces and added 3/8″ to the side seams. (Makes the side seam allowance 1″ instead of 5/8″) I measured the inseam at 29-1/4″  I like a 29″ inseam but decided not to change length for now. That’s really unusual.  I can’t think of another pant pattern that I have not removed 2-4 inches from the leg length.  I trimmed the crotch seam allowances to 3/8″. That’s my preferred. A 5/8″ doesn’t curve nicely around the crotch unless it is clipped. In which case you can’t let that seam out if you want. So I just accept that crotch seam will not be changed and trim to 3/8″ where it does curve nicely.

I think I need to buy muslin fabric. I’ve decided new pants patterns aren’t going to fit without major changes and always need a muslin. But searching my stash turns up fabric I want to save for ‘good’; too dark to see details; or wrong stretch/fabric type. Finally I find a bright true-blue, stretch poplin purchased from Fashion Fabrics.com years ago.   I remember buying this fabric with the idea of a blouse.  It’s too hefty for that so I held onto it for a jacket. I rarely make jackets and this beautiful blue has sat neglected for several years. At least as a muslin it will be used and while not the first on the list, it is in the list of recommended fabrics.  My fabric is a cotton/lycra blend with 15% stretch. Well, it stretches a little further but I won’t wear pant stretched like that.

I press my fabric and lay it out. Pin out the tucks in the front and pin-up the hem allowances. This will be a muslin. I mean, who puts bright blue on their butt?? Can tell you not a 6-decade overweight girl would be caught like that. I lay out the pattern pieces and go thread the sewing machine with water-soluble thread. I’m pretty sure I will be ripping seams. May as well start with WST .

Once again, this is a multi-post project.  Please come back to follow along with my progress.

Silhouette Patterns

A perplexing point in my pants fitting

I’m working with Silhouette Patterns 3414

and I’m definitely at a stop-and-think-what-you-are-doing point.  I acknowledge some astonishing success with 3200, Sally’s Pant.

OK I followed the rules. I bought the pattern, checked finished measurements and then made a muslin. It was pretty good but required modest (1/2) hip line  and small (1/4″) upper inseam darts and a few nominal changes like shortening the legs drafted for a 5’6″ figure to fit a 5’3″ woman. Nothing spectacular. My biggest disappointment was that the envelope stated the hem circumference would be about 17″ for the large sizes (which I am).  My hem was 5″ larger–not even close to promised.

I always intended to go back and slim that leg but got side tracked and along the way bought 3414 which I’m working with now. My first version of 3414 was similarly pleasing. Crossing my fingers for luck I applied the same 1/2″ hip line and 1/4″ inseam darts that were successful for me previously. Oh, as well as the few other changes I need like shortening the legs. This pair finished with 24″ hem circumferences (me not happy). But had the back had looked as good as 3200, I would have been OK.

It did not. So I set about making a real muslin. Tweaking it and then a 2nd test fabric.

(Sorry the pic is so dark. I promise I lightened it.)

Next version, I doubled the depth of both the hip line and upper inseam darts.  I scooped out the crotch because it was cutting into me. However, this was not the answer

I took a step back, restored the crotch and for Version 3, I narrowed the hem circumference 2″ to 22″ and during fitting pinched out the excess material over the thigh.  This seemed fairly successful:


So for Version 4, current version, I marked the excess of V3 onto the tissue splitting the resulting fish eye dart between side seam (3/4″) and inseam (1/4″). I also reduced the hem circumference another 2″ to finish at 20″.  It didn’t work.

I think they are almost the same as the first Version! Like other pants patterns that I’ve tried to fit, I seem to have made a circuit. Never fully correcting the issues nor creating the pants I want to wear.

SoI doubled down on the fish eye dart for the side seam.  I increased it from the 1″ of V3 to 2″:

I’d call that a mistake. Why it worked that one time (later pictures of V3 are not so nice), I don’t know.

But I had a brain storm. Fish-eye dart wasn’t working. With apologies to all devoted Peggy Sagers Fans, hip line and upper inseam dart were unhelpful when making changes to the hem circumference. So, I pulled the pant up at the waist 1″ and scooped the crotch 1″


Much better but still not exactly what I want.  The hip is now too tight. I’m getting VPL and there is an apparent pulling at the knee and drag lines through the lower leg that previously did not exist! Much as I love Peggy, I really have come to love her, I don’t think her fitting procedure is doing all that I want.  It seemed to work as long as I didn’t want a style change. As long as I’m satisfied with a big hem circumference.

Honestly, not sure what direction I will be taking with pant fitting. I have a goal, trouser/slacks that sit at the waist with an 18-20″ hem circumference. Not skin-tight but curve skimming.  Just not sure how to get there.