I’ll say it again and again and again. Pants are easy to sew! I used water-soluble thread in the bobbin. I cut the inseams 1/4″ wide so I had to serge them but otherwise, basting all the way including the yoke, zipper and waistband. No other edge finishes–this is a test garment. My personal experience is that without the zipper and waistband in place, I can’t adequately fit the pant. Happily I had 5682 View B ready to try on in what seemed like no time (about an hour because I did add interfacing to both waistband and facing). Before trying on, I measured the front and back crotches on the sewn garment. I came up with 16.25″ in back 13 in front. I always take that with a grain of salt though because it is hard to manage fabric, zipper, multiple seams and ruler or measuring wheel. IOW the measurements might not be accurate.
Fit 01


This is a terrific first fitting, after all, I have worn worse looking pants. I don’t see or feel any large issues. It really looks like I will be tweaking rather than making substantial changes. I’ll remind you again, the fabric has no stretch while the pattern specified denim or stretch woven. Some of the appearance of ill fit might be a result of the no stretch.
I’m just not sure about the front. Does the tummy look tight to you? I am unsure about the front crotch. It feels long enough but I think should be reshaped a little just before the curve. That’s not unusual for me. The paren () crotch shape just isn’t mine. I recognize the familiar diagonal lines over by the sides.
The back looks both a little tight and the crotch a little wrong. During the pics I could tell it was gaping. I think that had more to do with a front waistband flapping about issue. The waistband ripped away about 3″ close to the zipper. WST is great for test garments but that is a disadvantage. With this fabric instead of a folded mess I’m getting poof underneath my rear. The sideline:

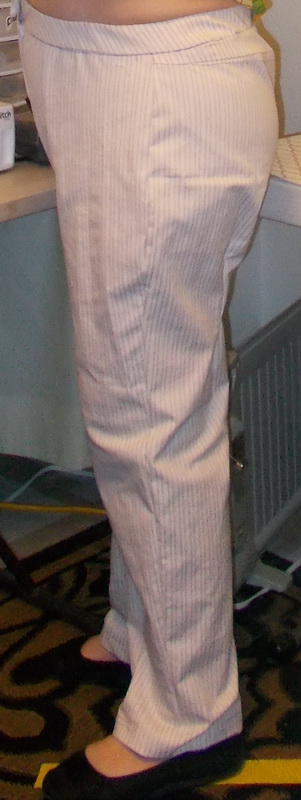
drops straight from waist to knee; ;buckles a little at the knee and then drops straight to the hem. Nice!
Changes:
- Stitch the waistband together in front
- Let out the side seams 1/8″, evenly (no curves on the side seam; the change needs to be evenly divided.)
- Make the first Diagonal Dart 1/2″ deep
Fit 02:


Well the ease added to the front did nothing to improve it’s looks. The 1/2″ total ease added made the waist too big. I pulled it tight and clipped in place for the pics. On the side, the seam still drops nicely from the waist and in this pic all the way to the ankle. I can clearly see the diagonals which have always been the result of the side seam being too long. I am not sure why those diagonals are extending beneath the back waistband downward towards the left or right. The leg and yoke joined smoothly without the slightest stretching. Have to think about that.The extra ease does make the back across the hip looks a little nicer. I think that the back crotch may still be a bit short–even though it measures 16″ the amount specified by my bowl. It just seams to be tucking up into my bifurcation. I’ve basted a 1/2″ deep fish-eye dart across the right leg. Which has me undecided. The right leg looks much nicer from the dart to hem but from dart to butt it has developed some nasty diagonals. Frankly, I’d rather have the poofy look of the left leg;and remember I already made a 3/8″ inseam dart to the pattern. I shouldn’t need to make it now. Usually I put off scooping the crotch. But I strongly felt the front crotch needed to be reshaped (it did) and so did the back crotch at the same time.

both are just slight changes. More like refining the crotch shape changing from () to L’s.
I slimmed the hem to 17″ by increasing the SA at the hem 1/2″ tapering to 3/8″ from the knee to wait. Was planning to change the inseam hem the same amount on the tissue but I like the way this leg looks. However, I don’t like this pant for jeans. It would be useful to me as a slacks pattern should I be able to solve all the issues noted above. I like best the front of Fit01 and the back of Fit 02, again as a slack. not a jean
Planned Fit 03 Changes:
- Add as much length to back crotch as possible.
- Offset waist band 1/4″ side seam to CF
- Ease pant to waist band so no ease is added at the waist.
- 1/2″ Vertical fish eye dart applied to the left leg.
I offset the waistband 1/2″, I wanted to be very sure I had removed enough to make a difference. Next I added 2″ strip at the top of the pant leg and then stitched the yoke so that 1/2″ was added to the crotch length. Inside the back looks a little odd…

..but this is a test garment. I’m not concerned about looks so much as results. Finally I made the fish eye dart 1/2″ deep in the left leg.

I tried placing the dart so it would look like a gusset which is a very common and acceptable tailoring aid. Then I took pics:


I would say disappointing pics because I don’t see any improvement. In fact, I think the back leg looked better before the fish eye dart


Before Dart After Dart
It’s possible the dart is in the wrong place or not deep enough.
I know someone out there is eager to suggest Peggy’s solutions. First I am not removing any length from the crotch. I need every 1/4″ especially with this non-stretch fabric. As for the top of inseam dart, I put that in the tissue. It is already incorporated and is not having the desired effect. It is ludicrous to expect to do the same exact thing but get different results. IOW I’m not adding another top of inseam dart. It’s done. It failed. I’m not repeating the failure.
I have 3 issues on the front
- it now has too much ease due to adding more for the back in Fit 02.
- the waist is still too large even though I have reduced it through easing the pant leg to the waistband. For the Fit 03 pics I still needed to overlap and clip at the front
- Those diagonal wrinkles were not reduced one iota and I doubled my initial estimate of how much needed to be removed.
So what will I do. I’m going to remove the ease added to the front in Fit 02 by using a narrow seam in the center of the front. I will offset the waistband another 1/2″. I’m tired of moving the waistband back and forth. I am adding elastic and letting the elastic gather the waist to my body. In Fit 02 and 03, I have adapted the waist by overlapping further in front. While it makes the waist smaller it does pull the sides toward the center as when we tie a blouse at center front:

My rayon blouse cooperates and ties very nicely. The stiff cotton fabric does not ie. I pull. It resists.
Fit 04 I put a 1/8″ seam in the center of each leg which removed 1/4″ circumference. I offset the waistband 3/4″ lower to help with the diagonal lines and I inserted 1-1/4″ wide elastic into the waistband so I wasn’t pulling to any particular point when snugging the waist to my body. Truth is, I add elastic to all my waistbands. I enjoy the comfort it gives me to have a waistband that will stretch a little when my tummy needs it. Oh and I learned this trick from my favorite jean after taking an old pair apart one day. Let’s look at the side view first
I am happy to see nearly all the leg diagonals are gone. Those that remain are at the knee or lower and may be the result of knee movement or the below ankle length I’ve chosen. IMO sides are fine. I see no further reason to work with them.

Yes it is blurred. I don’t understand. My camera is placed in a fixed position. It cannot move. I set the timer then go take my position and stand very still until I hear the click of the shutter. How do I get blurred pics? Well the most important thing here is that I moved the vertical fisheye dart from the gusset area to the center-back, left-leg. The change did not improve the back of leg. The better leg is still the fish eye, diagonal dart on the right leg.

FIT 04 Fit 01
The front is… well not what I was expecting. I thought returning the front circumference to the default, since it looked so good in Fit 01. While the diagonals disappeared on the back and side views, my front has developed prominent Jodhpur thighs. But as I compare carefully, I see that there were always deep folds across my thigh crease and the diagonals below. It is some how like the fabric is falling sideways and then down.
Truthfully, I am not sure what to do. This is particularly disappointing because I have felt with each fitting that I almost had it. Like the next tweak would be the last. For now, I have pressed carefully and hung in the closet. Tomorrow, I hope to be inspired with new ideas and new solutions. For, as of now, 5682 View B is a DUD.


