Jinni, Jinni, My Bowl

The Fabric Always Wins, Especially In Pants

I transferred the waistband location  added SA and marked the darts, but I did not transfer any of the other changes made to the muslin.  For fitting insurance, I marked 1/2″ above the marked seam allowance. I can always trim. Adding after-the-fact is difficult if not impossible.  Plus that gives extra to shape for the dart tops.

Then I begin the job of choosing a fabric.  The muslin looked so good I wanted to use a reasonable good fabric in this (I hoped) first pair of pants. Because my alterations have increased the hem circumference to 24″, I wanted a fabric that draped close to the body but not  reveal all.  Normally my pant colors are black, dark navy blue and dark chocolate brown.  All colors that are difficult to photograph and  will be difficult for me to see drag lines.  My chosen fabric is a caramel brown.  It is Polyester with a little Lycra which Fabricmartfabric advertised a Fine  Twill.  I love this stuff. Buy it everytime I see it on their website. Has 10% crosswise stretch–no vertical stretch.  It is light weight as in ounces per square yards but feels  heavy in-hand and drapes like crepe.  The weight I have  is not a winter fabric unless I wear thick tights or long johns.  It works fine for fall,  spring and some summer occasions.

I cut my fabric and serge finished all the edges.  I put the zipper in then swapped out to water-soluble thread in the bobbin before basting everything together.

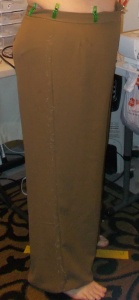
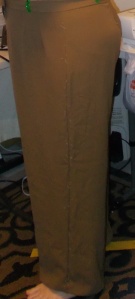
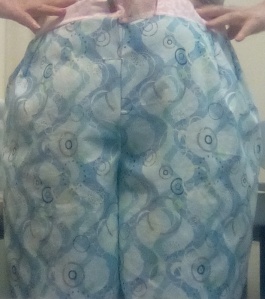
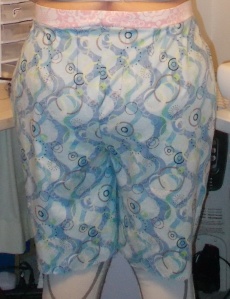
As with the muslin, fitting was all about correctly placing the waistband aka crotch depth. I was shocked that my crotch depth was 2″ too long.  Here’s my first fitting.

Fit01

I embarked on a series of fitting adjustments all tweaking the crotch depth and adapting the waist to the WB.  Eventually I settle on decreasing the front crotch and sides 2″ but the back 3″.  I also offset the back side seam to add another 1/2″ ease across the seat (and there is still a hint of  VPL).  I want you to see the final fitting before the finished garment:

Last fitting:

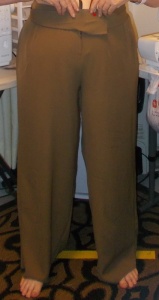
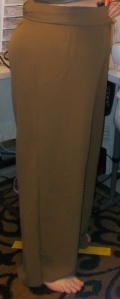
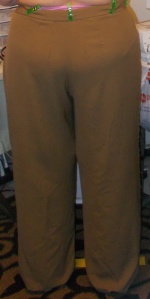
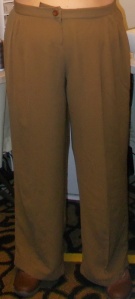
Pretty nice, if I do say so myself. From there I opened seams where they crossed just enough to get and make permanent stitches.  I trimmed the excess at the top and the point which formed where the inseams and crotch met. Hemmed and applied the waistband. Nothing was entirely ripped. Buttonhole and button were carefully placed to they would occupy the same place at the clips. The finished pant fits slightly different from the final fitting.

Finished:

I immediately noticed that the waistband was not as firmly in place as before and I could feel the pant drop slightly.  It also appears that I have lost 5 pounds in the 24 hours between last fitting and final pictures.  I really should start automatically inserting elastic before I nail the waistband in place. Just for info purposes, last fitting was done about 2 o’clock the day before. Final pics about 2 o’clock the next day.  TMI but no I have not been starving myself, peeing a lot or had diarrhea. Well moving along… the  real problem with this pair of pants is: once I have a good fitting pair of pants, I can’t stand to wear the others. I will have to be making more and making them soon.

I did not transfer my depth changes to the pattern.  I am unsure why the torso (from waist to crotch) grew 2″ in front, 1″ on the sides, and  3″ in back. Honestly, I didn’t know whether the fiber (poly lycra), the weave (fine twill)  or 10%  width-wise stretch which made the huge difference. Normally a 10% stretch fabric behaves much the same and is treated as a stable weave/knit.  I know there can be some difference even if the fiber and weave are the same.  I expect  more difference when the stretch factor gets to 25% and am pretty sure that a 50% or greater stretch will almost require an entirely different pattern.

I’ve made a trouser.  I didn’t start out to create a trouser. I would prefer to wear a pant with lesser ease.  Not sure that will be possible for me. First my round, prominent rear will always need additional fabric. Covering the seat will probably add fabric across the thigh.  As I explained in the previous post, I just don’t know how to draw a curve adding 3″ to the side while dovetailing into the thigh side seam without adding more ease in the thigh as well.  Because of how I did my tissue alteration for the seat, I added 3″ to the hem. That created a 24″ hem circumference.  Even with this nicely draping polyester fabric, I don’t like the 24″ finished hem circumference.   I am narrow shouldered and short. A big wide leg, makes me look shorter and my shoulders narrower. In future makes, I will attempt to make the legs narrower, about 20″.  However, for the next pair, I want to test  crotch depth changes by sewing the same (i.e.no other tissue changes) with a similar fabric.


Jinni, My Bowl

Working with the Tin Foil/Flexible Ruler Method of Cr0tch Fitting.

Let me bring you up-to-speed…

After I finished the Jinni Shorts that turned into culottes, it was mid-August.  I had enough wearable shorts for the rest of summer and it was too hot to wear or fit long-legged pants.  I  thought I would take a break from pant fitting for a few weeks. Come back in mid-September with a fresh mind and eyes.  In the next few days Pinterest kept feeding me pics of fitting pants using tin foil or wax paper or a flexible ruler.  After a few days of this bombardment,  I thought, “I’ve started this method before. Didn’t finish because I didn’t understand some things. It wouldn’t take long to make a quick ‘bowl’ to see if I’ve learned anything. Could use the Jinni’s…..” I’m figuring an hour or 2. Maybe a quick muslin and then toss the whole shebang.  I decided to use 4 Out of 5’s excellent instructions.  Created  my bowl. Then made a quick short’s length copy of my original Jinni tissues.  I pinned the tissues together and placed my bowl on top. Hmmm 4 Out of 5’s instructions made so much sense  I had to continue with a muslin. Over the next 4 weeks became 4 muslins.  I couldn’t quite perfect the crotch but I was really close. Each muslin had gotten better and better. More importantly with each muslin I realized why they didn’t work. Not just what was wrong, but what caused it to be wrong. After Muslin 3 I thought I had the answer.  I really thought I did it. I really thought if I made Muslin 4, I would  have perfected the crotch. I transferred the fitting change of shortening the length of the sides and cut Muslin 4. Front looked good. Sides looked good. Back looked good between waist and about 3″ above the inseam.  From there down it was crumpled all the way to the inseam. As I studied it and studied the tissue change, I realized I had relapsed and made the last change in a manner I know to be in error.  I had used darts in the tissue to shorten the side length. Why is this wrong?  It  doesn’t just change the length of the side. It changes the shape of the back crotch upright and skews the grain.

I wanted to fix my last error but something else had been nagging me. The back of my brain keep insisting I had forgotten something. Missed something. So  I hunted for videos until I found Joy and Vivian’s complete flexible ruler  demo Part1 and Part 2.  Ah hah! I had used the wrong undercarriage “spot”. I was supposed to mark the inseam not the place I did mark. So I wrapped the flexible curve around me and marked the inseam. On the my Bowl tracing the inseam point is moved about 1″ towards the back.  Then I traced a new copy of the Jinni and since it was now fall i.e. not shorts weather, I traced the entire leg.

I pinned the tissue leg together, this time allowing the extra 1″ at the inseam which fitting had proved I needed. It was another “Ah Hah!” when I placed the corrected Bowl on my pattern and compared the two.

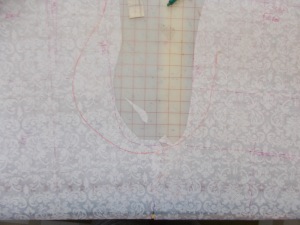
To me, it’s a little easier to see after I  trace the crotch shape with RED pen.

My crotch (Bowl) shape is a lot different from the pattern.  I do think it reflects the successful fitting changes I’ve had to make and maybe explains why some of the changes I’ve made were wrong or not enough.  Once I add the 1″ to the front crotch length, the  front usually needs only a little tweaking.  Correctly positioning the inseam on the Jinnie tissue automatically adds the 1″.  I should note that an additional 1″  for the front inseam is an option already drafted in the Jinni pattern. I would have to add that 1″ in other patterns.  When using the Bowl on the other muslins, I was scooping into the back of the crotch. Hollowing it out, 4, 5 and 6 inches. It would get better but never totally satisfactory.  The last few years, I’ve had to scoop in the bottom of the crotch (sometimes called lowering).  It occured to me that it was odd I didn’t need to scoop/lower the crotch.  With the Bowl correctly positioned, a lowering is clearly indicated. Also of note is when the Bowl is correctly positioned,  the back needs to be scooped only 3″.  One last observation, from this Bowl it appears I need to shorten the front crotch depth 4″ and the back  depth 1″.  4OutOf5 shortened immediately.  I  decided to wait and  set the crotch depth by placing my pant where I want it on my body and then mark the waist.  I added 3/8″ SA to the red back crotch curve  blending it to the front as-drafted-curve.  I trimmed the excess tissue from the front and set it aside. I know that scooping 3″ out of that back curve is going to make it impossible to put the pant on. My hip is 48″. Most pants have 2″ ease so that means there is probably 50″ circumference part of which is in the front. When I scoop the back crotch 3″ I will be removing 6″ of circumference (2 backs so 2*3″=6″).  Subtract the 6 from the 50 and there will be 44″ of fabric to cover a 48″ rear. Not going to work.  I have yet to see a demo of how to add 3″ to the side at the hip.  The instructions say to add it straight across from where you scooped and blend the curve back into the waist and thigh. Have you tried adding 3″ to the side?  I have and I can’t figure out how to blend it smoothly.  I always end up with a big curve on the side. Which BTW always ends up adding inches to the thigh as well as changing the side length.  It’s one of those things I’d really like to see someone do.  5Outof4 has only 1″ to add and  that does blend pretty smoothly.  This is the point at which I have quit in the past.  I simply don’t know how to smoothly add the large distance I need for my round, prominent seat. I really wanted to test this new crotch shape. So I added the 3″ my way. I cut the back tissue  vertically along the grain line and inserted 3″ of tissue. I don’t like this solution because it adds too much ease across my thigh and changes a slack leg into a trouser. Currently, I really want to make the Bowl work. So whatever the change does, it does.

As you can see above, I trimmed the excess tissue from the crotch and the rest of the pant. Almost as an afterthought I shortened front and back leg 1″.

Then I selected a new muslin fabric. This is a non-stretch, cotton broadcloth.  It is a little lighter than I would prefer for pants. A little heavy for a blouse. I preshunk and pressed. Before laying out the pant legs, I folded them up 6″.  This is a disposable. I only need enough length to be sure that the leg length is affecting the pant drape.

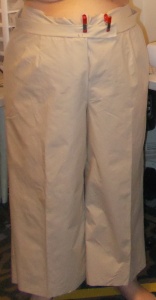
So onto fitting. Fitting was all about getting the waistband properly positioned and getting the darts right.  I did not adapt circumference in the torso, hip or leg even though that first fitting  begged for less in front and more seat room

The next 2 fittings tweaked the length of the crotches and distribution of the waist ease.   Once that was done the front started looking near perfect. The back was a matter of adding crotch depth  while increasing the angle of the center back seam.  The more I tried on the muslin, the more the fabric wrinkled and misbehaved. In the last pic, I believe I have both near perfect front and back.

I took 3 pictures of the back. These are the best. The fabric seems to hang up in a couple of places IOW, this cotton broadcloth does not float over the body. Nope, it grabs and holds onto whatever is beneath. I can see and adjust the front and sides, while looking in the mirror. Cant see the back in the mirror. Best I can do is smooth my hands over it, but I don’t know what it looks like until I see the pic on my big pc.


The back crotch itself is pretty smooth, which is what I am most concerned about.

Interesting  note. According to the tissue with Bowl, I needed to shorten the back crotch depth 1″ the front 4″.  When finish, the back is not shortened at all. The side length is shortened 3.5″. The front is shortened 2.75″.  My waist is  a real roller coaster ride.

A second interesting note:  The crotch and seat felt comfortable through every fitting.  Even the first where the seat looked obviously too tight. Every depth change made the crotch, seat and stomach even more comfortable. Let me say that a little differently, every time I adjusted the crotch depth a 1/4″ to be  a little shorter in front or a little longer in back, made the entire torso feel more comfortable.

So what to do next.  Well, I am not worrying about leg width. I want to be sure the waist, torso and crotches fit well. So I am transferring the crotch depth and waist shaping to the top and back leg — no darts in the tissue.  I will mark the dart positions, lengths and widths on the tissue as I draped them on the muslin.   I am really not changing the tissue much.  I will change to a better fabric. I’m thinking that with those large legs a nice crepe or rayon…..

DraftingFitting, Jinni, My Bowl

Fitting burn

I’ve just had the most annoying experience.  I’ve been experimenting with the flexible-ruler method. I’m 3 fittings in. Thought it was looking pretty good. At least the crotches were not their normal bunching, pulling selves.  Last fitting, last set of pics taken about 3PM and I swear I was busting out of the muslin. Could barely close the waistband and the pins were straining to keep the front closure closed.  That was after having added 1″ to the WB  length. Could not pinch any ease at the sides.   I was afraid to sit down–which at some point you must do with a pants muslin—for fear the pins would go flying and the seams split. Drag lines were everywhere and prominent. Well below the crotches  in the thigh area were  little commas  — i.e. crotches not bad at all.

In the morning, I’m thinking,I would like to scoop one final time and add more ease if its really needed.  So at 12 noon, I try the muslin on again. Son of a gun!  I can pinch 2″ on each side. Most of the drag lines have simply disappeared. The waistband easily closes and the front opening overlaps on its own. I didn’t even pin closed the front opening. Compare the 2 fittings before I continue my rant and finish with 2 questions.

Front:

Evening                                                   12 Noon

Back:

Evening          12 Noon

Granted with the patterning of the fabric, it can be hard to see what is going on.  But why such a difference between noon and afternoon fittings?  I’ve already eaten a small lunch, as usual and same as yesterday.  I have not had a BM  (did yesterday) so clearing that area is not a factor.  In mid-afternoon I may have a small snack. I do mean small. 4 carrots, or a whole, small tomato; a small scoop of cottage cheese. Chips, candy, cookies have been eliminated from my diet. Large meals are also gone. At most I have 3 small meals and the afternoon snack. Point being that neither today nor the day before, at any time  was  my stomach over-filled with food and my gut filled with toxic wastes.  So….

Why  is the am/noon fitting better than the PM?

Do you fit for the am or pm?


Some evenings I just cant stand my clothes and either unbutton/unsnap/unbelt or make an early change into pj’s. I’m inclined to fit for PM but then the garments will be too loose in the morning. If I fit pants for the evening, the won’t stay at the waist in the AM. What to do? What to do?